
Print Finishing Techniques: Lamination, Foil, UV, Embossing & Die Cutting
This guide is written for buyers, designers, brands and product developers who need to understand print finishing as part of the production process. The goal is not simply to list technical terms, but to explain what each finish solves, how finishes can be combined, and how they affect cost, artwork and manufacturing.
What Are Print Finishing Techniques?
Print finishing, also called post-press, refers to the processes added after printing to protect the printed surface, create decorative effects, or convert a flat printed sheet into a usable product.
Common finishing methods include lamination, varnish, aqueous coating, UV coating, spot UV, hot foil, cold foil, embossing, debossing, creasing, die cutting and binding. For notebooks, gift boxes, stationery and retail packaging, the finish influences not only appearance, but also durability, moisture resistance, colour perception, recyclability, MOQ, unit cost and lead time.
Quick Selection: Which Finish Should You Use?
| If you need... | Specify | Main consideration |
|---|---|---|
| Scuff and moisture protection | Lamination or aqueous coating | Film lamination adds a plastic layer |
| Low-cost rub protection | Flood varnish or AQ coating | Limited tactile effect |
| Glossy detail on a matte surface | Matte lamination + spot UV | Needs a separate UV mask |
| Metallic logo or fine metallic detail | Hot foil | Requires tooling and a separate pass |
| Large metallic area or long run | Cold foil | Works best on compatible coated materials |
| Raised or recessed logo | Embossing / debossing | Requires tooling and suitable substrate thickness |
| Custom shape or window | Die cutting | Requires a cutting die |
| Crack-free fold on heavy stock | Creasing | Especially important on dark, laminated or heavy stock |
The Three Main Types of Print Finishing
· Protective finishes - lamination, varnish, aqueous coating and UV coating. These sit above the print and take abrasion or surface wear.
· Decorative finishes - foil, embossing, debossing, spot UV and textured coatings. These add visual contrast, metallic effects or tactile detail.
· Converting processes - creasing, folding, die cutting and binding. These turn the printed sheet into its final physical form.
Another important production distinction is inline versus offline finishing. Inline processes can be completed on the press line, while offline processes require the sheets to move to another machine. Every additional offline step adds another setup, machine queue and opportunity for registration drift.
Lamination vs Varnish vs Aqueous Coating vs UV
| Process | Protection | Surface effect | Relative cost | Common use |
|---|---|---|---|---|
| Varnish | Basic | Gloss / matte / satin | Low | Basic rub protection |
| Aqueous coating | Moderate | Low to moderate gloss | Low-medium | Paper and carton protection |
| Lamination | High | Gloss / matte / soft-touch | Higher | Frequently handled covers and packaging |
| UV coating | Hard, resistant surface | High gloss or spot effect | Medium-high | Premium visual highlights |
Lamination
Lamination bonds a thin film to the printed surface. The most common options are gloss, matte and soft-touch film. It improves scuff resistance, moisture resistance and durability, which is why it is widely used on notebook covers, gift boxes, menus and retail packaging.
The trade-off is that film adds another material layer. If recyclability is a key requirement, the project should evaluate whether an aqueous or other lower-plastic surface treatment can achieve the required performance.
Varnish and Aqueous Coating
Varnish is a thin liquid protective layer, useful when the main goal is to stop printed ink from rubbing during packing and transport. Aqueous coating is a water-based surface treatment commonly used as a flood coat and offers a balance between protection, production efficiency and a more paper-like surface.
UV Coating and Spot UV
UV coating is a liquid layer cured quickly under ultraviolet light. It forms a hard, glossy surface. When it is applied only to selected artwork - such as a logo, title or pattern - the result is spot UV.
One of the classic premium combinations is matte lamination plus spot UV: the background stays flat while selected elements catch the light.
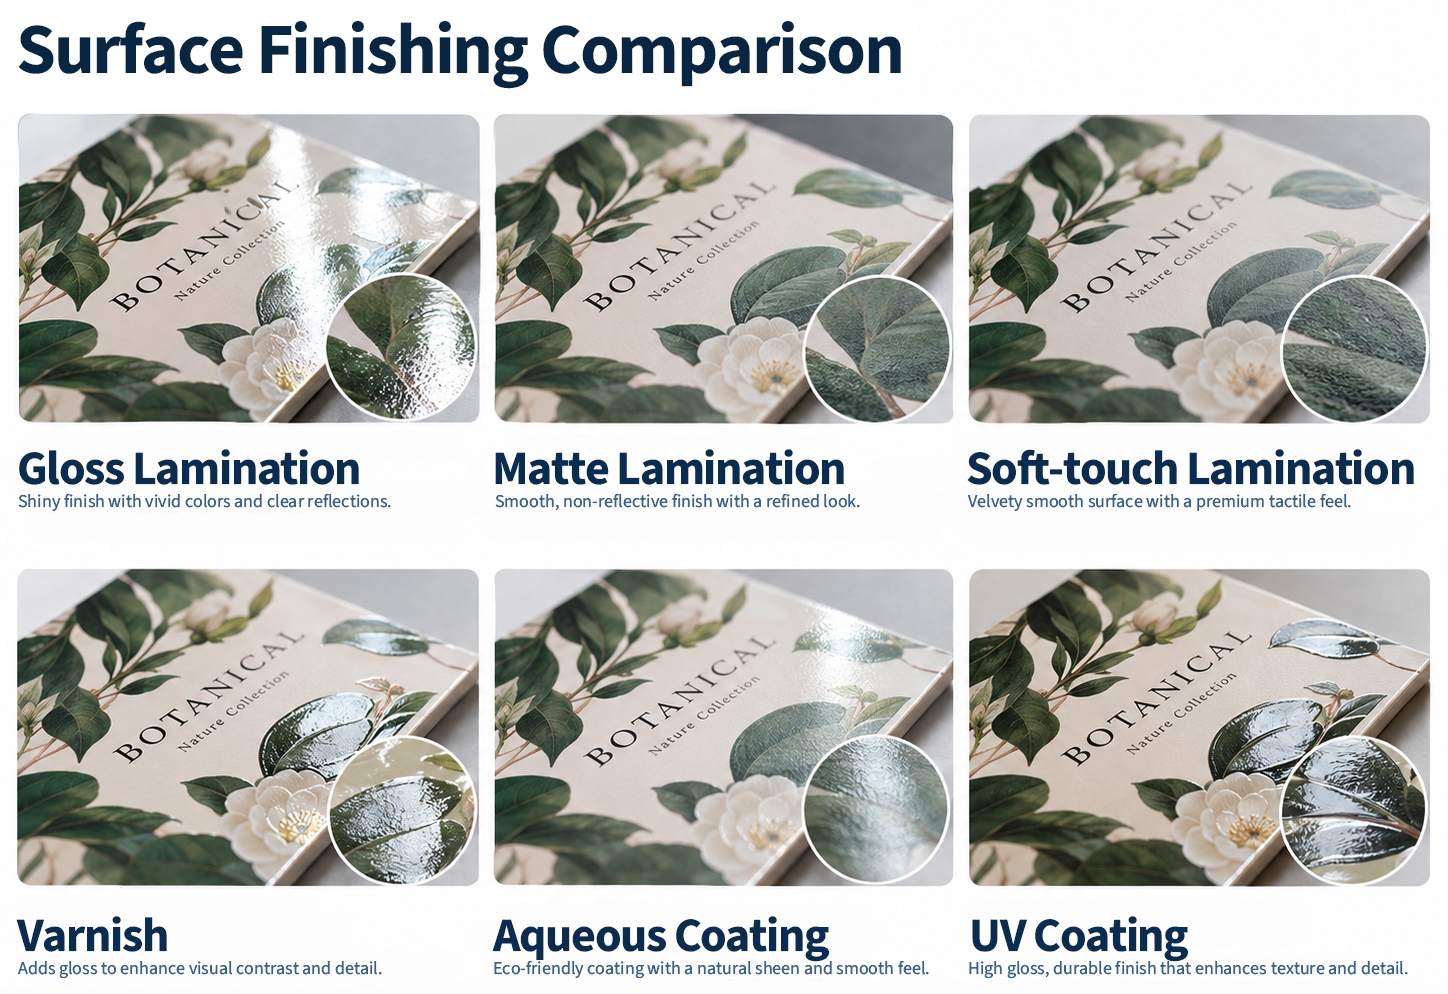
Figure 1. Surface finishing comparison: lamination and coating effects.
Does Lamination Change Printed Colour?
Yes. Gloss film reflects light more directly, which can make colours appear richer and blacks deeper. Matte film scatters light, which can make colours appear slightly softer and turn a solid black toward charcoal. Soft-touch film is also generally matte in appearance, so it changes perceived contrast in a similar way.
If a brand colour or dark background is critical, a physical proof made on the actual stock with the actual film is more reliable than a PDF proof alone.
What Is Soft-Touch Lamination?
Soft-touch lamination is a matte film with a smooth, suede-like feel. It is widely used for diaries, planners, notebooks, gift packaging and premium stationery. Its main value is tactile rather than glossy.
Soft-touch film pairs well with blind debossing, foil or spot UV, but compatibility should be checked before production if several finishing processes will be stacked.
Hot Foil vs Cold Foil: What Is the Difference?
| Feature | Hot Foil | Cold Foil |
|---|---|---|
| How it works | Heated die transfers foil under pressure | Adhesive receives foil and is cured |
| Metal tooling | Yes | Usually no traditional metal stamping die |
| Fine detail | Better for fine detail | Better suited to larger areas and continuous production |
| Substrates | Broad range including textured stock and PU | More dependent on compatible coated surfaces |
| Short runs | Often practical | Not automatically cheaper |
| Long runs | Relatively slower | Strong fit for high-volume inline production |
| Appearance | Strong mirror-like metallic effect | Useful for large metallic areas and overprinted metallic colours |
When Is Hot Foil a Good Choice?
Hot foil is often a good fit when the project needs strong metallic brilliance, relatively fine logo detail, textured paper, PU or a short-to-medium production run. It requires a physical die, so there is a fixed tooling cost, but it can still be the more economical route at lower quantities.
When Is Cold Foil a Good Choice?
Cold foil is well suited to coated materials, larger metallic areas and longer production runs. Because printing can continue over the metallic layer, it can also create a wide range of metallic colour effects from one foil base.
Is Cold Foil Always Cheaper?
No. Cold foil removes some traditional metal tooling, but the production setup is different and still requires compatible equipment, adhesive and make-ready. At smaller quantities, setup may still dominate the cost. The efficiency advantage becomes more meaningful as volume increases.
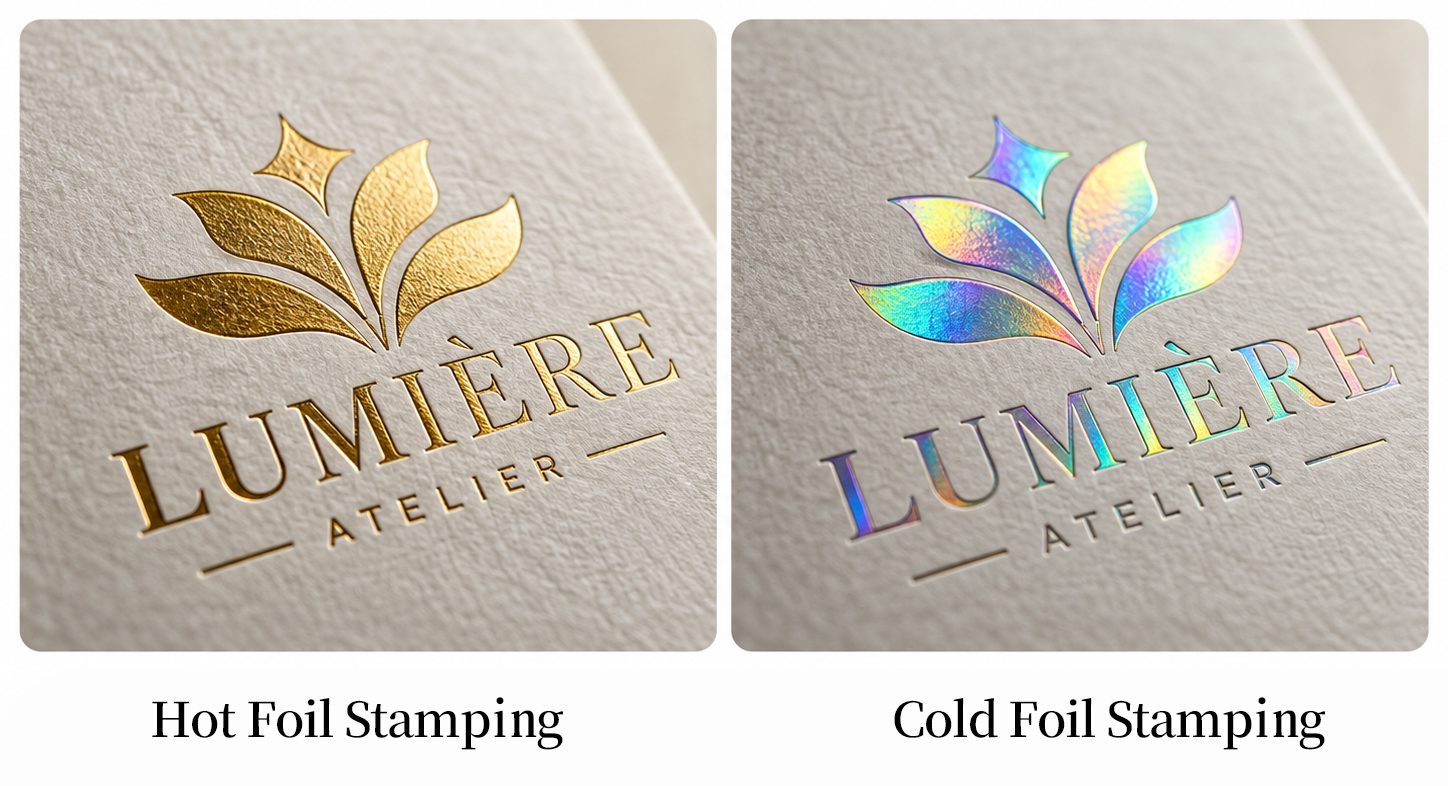
Figure 2. Hot foil stamping vs cold foil stamping.
Embossing vs Debossing
Embossing raises the design above the surface. Debossing presses it down into the material. Both depend on tooling and pressure, and the substrate needs enough thickness and compressibility to hold the impression cleanly.
| Feature | Embossing | Debossing |
|---|---|---|
| Surface effect | Raised | Recessed |
| Visual style | More prominent | More restrained |
| Common applications | Logos, repeating patterns, gift packaging | PU covers, minimalist branding, leather-look materials |
| Ink required | No | No |
| Can combine with foil | Yes | Yes |
When the effect uses no ink or foil and relies only on shadow and surface relief, it is commonly called blind embossing or blind debossing.
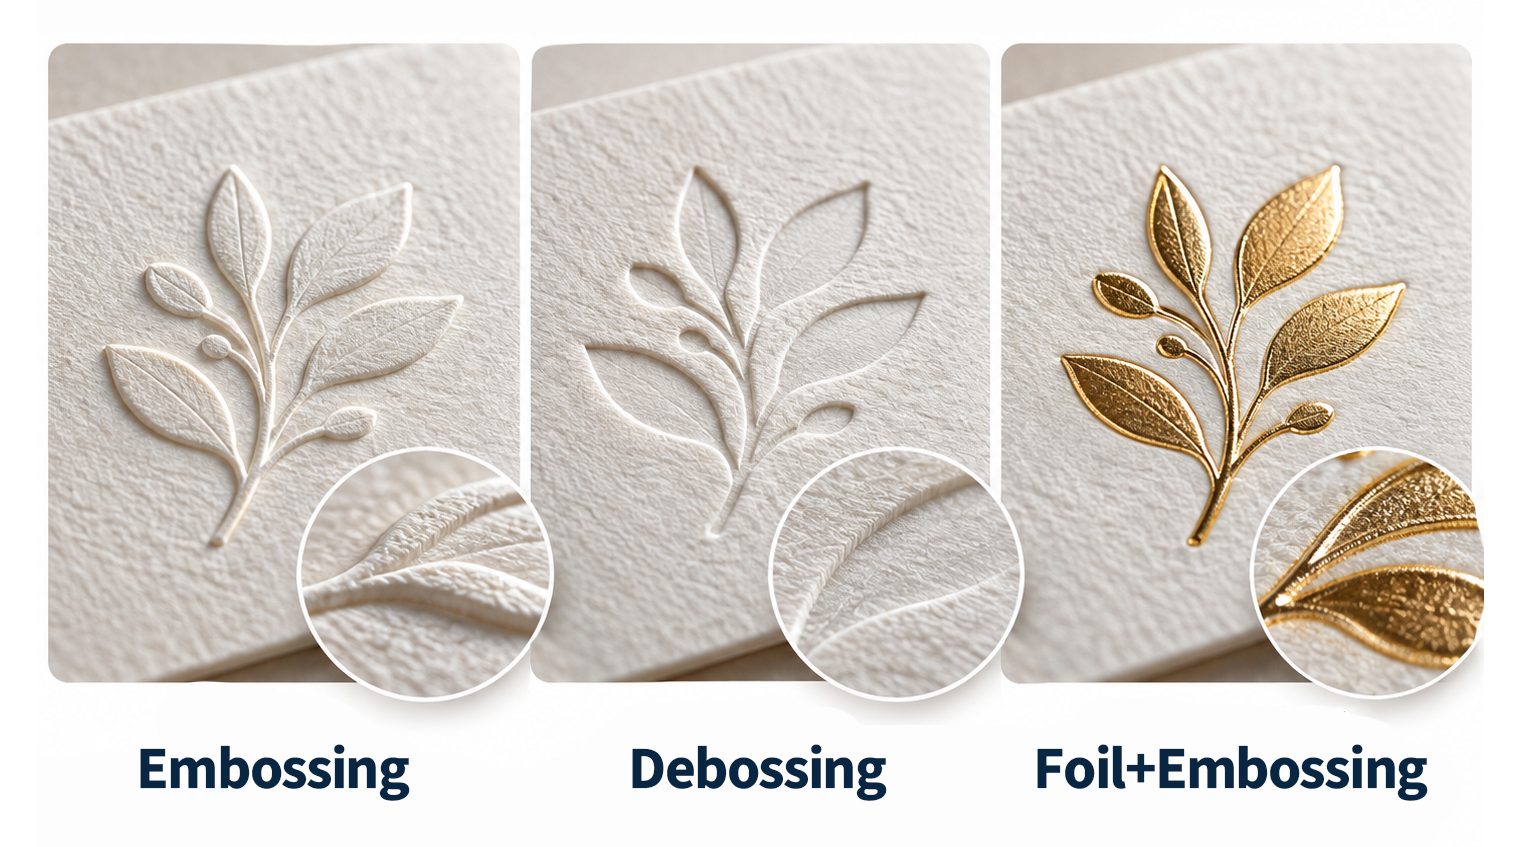
Figure 3. Embossing, debossing and foil plus embossing.
Can Foil and Embossing Be Combined?
Yes. Premium notebooks, diaries and gift boxes often combine metallic colour with physical relief. This can be done with a combination tool in one operation or by foiling first and embossing in a second pass. The two-pass approach adds setup but may provide more control on demanding premium work.
Every additional registered process adds tolerance. Artwork should not require two separate finishing processes to meet perfectly along an extremely fine edge unless the supplier confirms that the design is practical.
What Is Spot UV, and Is It the Same as Embossing?
Spot UV applies UV coating only to selected areas. It changes gloss and surface hardness rather than physically shaping the substrate. Standard spot UV may have a slight build, but it is not the same as true embossing.
If the brief requires a clearly raised tactile effect, confirm whether the supplier means high-build UV, textured UV or actual embossing.
Why Does Heavy Stock Need Creasing Before Folding?
When heavy stock is folded without a crease, the outer paper fibres and ink film are forced to stretch and may crack, exposing white fibre. The risk increases with heavier stock, dark solid ink coverage, lamination and other added finishes.
Lamination, foil and coating all increase thickness or stiffness, so creasing becomes even more important after finishing.
Why Does Grain Direction Matter?
Paper has a dominant fibre direction. Folding with the grain reduces the risk of cracking, spring-back and rough fold edges. Folding against the grain is especially risky on heavy or dark printed stock.
What Is Die Cutting?
Die cutting uses a shaped cutting tool to create outlines, windows, hanging holes or custom profiles that cannot be produced with ordinary straight trimming.
Typical applications include gift-box windows, hanging holes, shaped folders, display packaging, rounded profiles and specialty stationery. Because the die is a physical tool, a custom shape usually involves a one-time tooling charge.
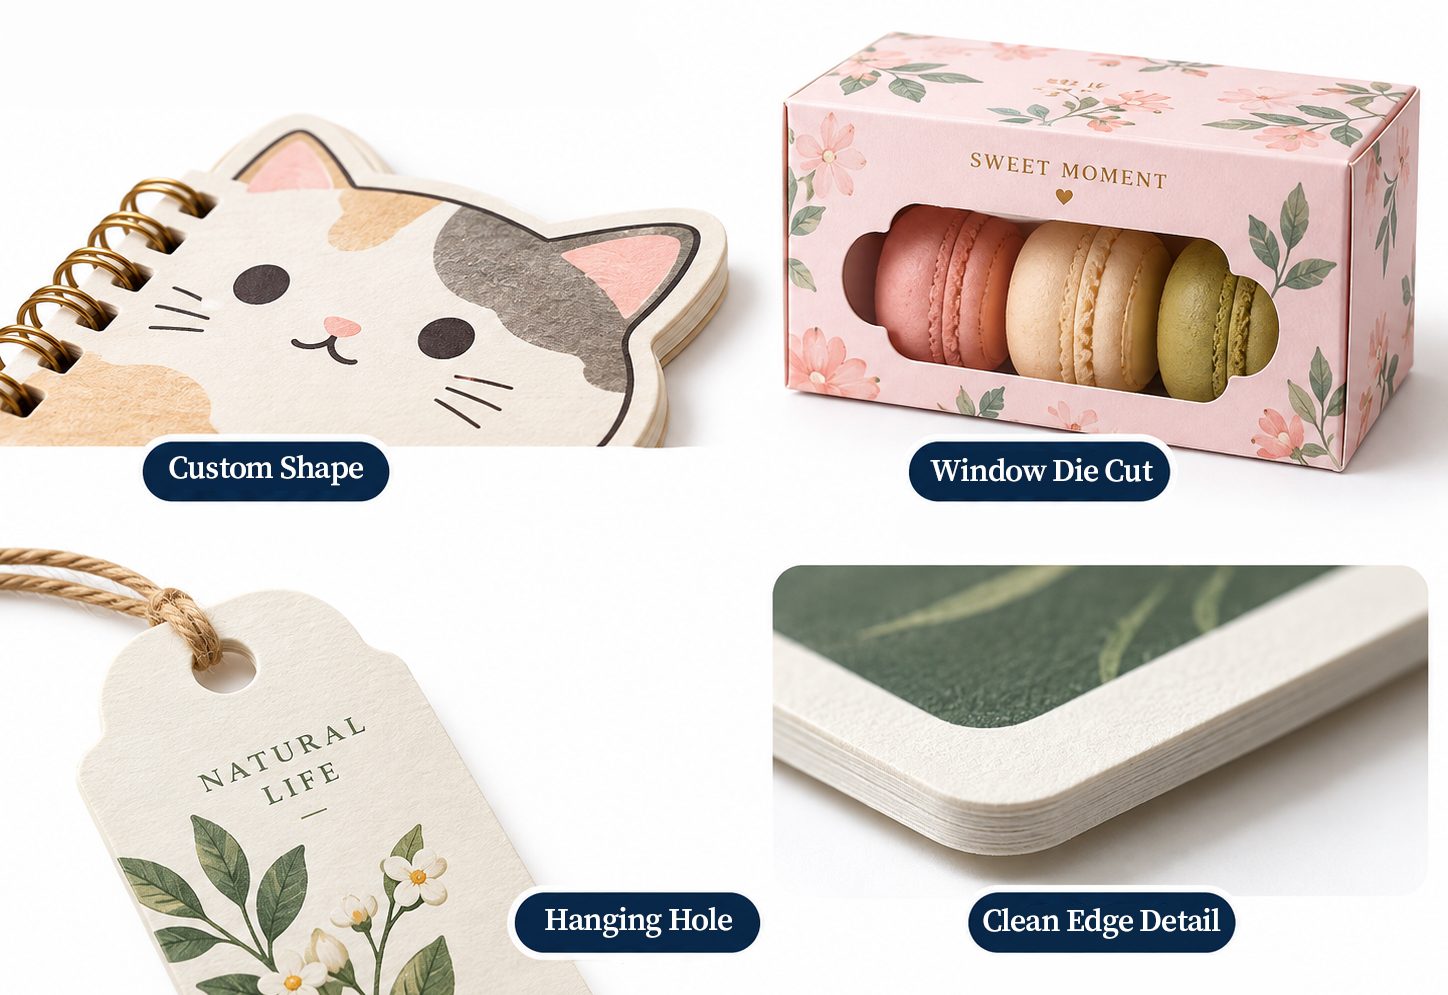
Figure 4. Die-cutting applications: custom shapes, windows, hanging holes and clean edges.
Which Print Finishes Work Well Together?
| Combination | Typical result |
|---|---|
| Matte lamination + spot UV | Strong contrast between flat and glossy areas |
| Hot foil + embossing | Metallic colour plus physical depth |
| Soft-touch lamination + blind deboss | Premium tactile surface with a shadow-only logo |
| Texture embossing | Adds linen, leather or other material-like character |
| Foil + spot UV in separate areas | Multiple visual highlights without forcing them to overlap |
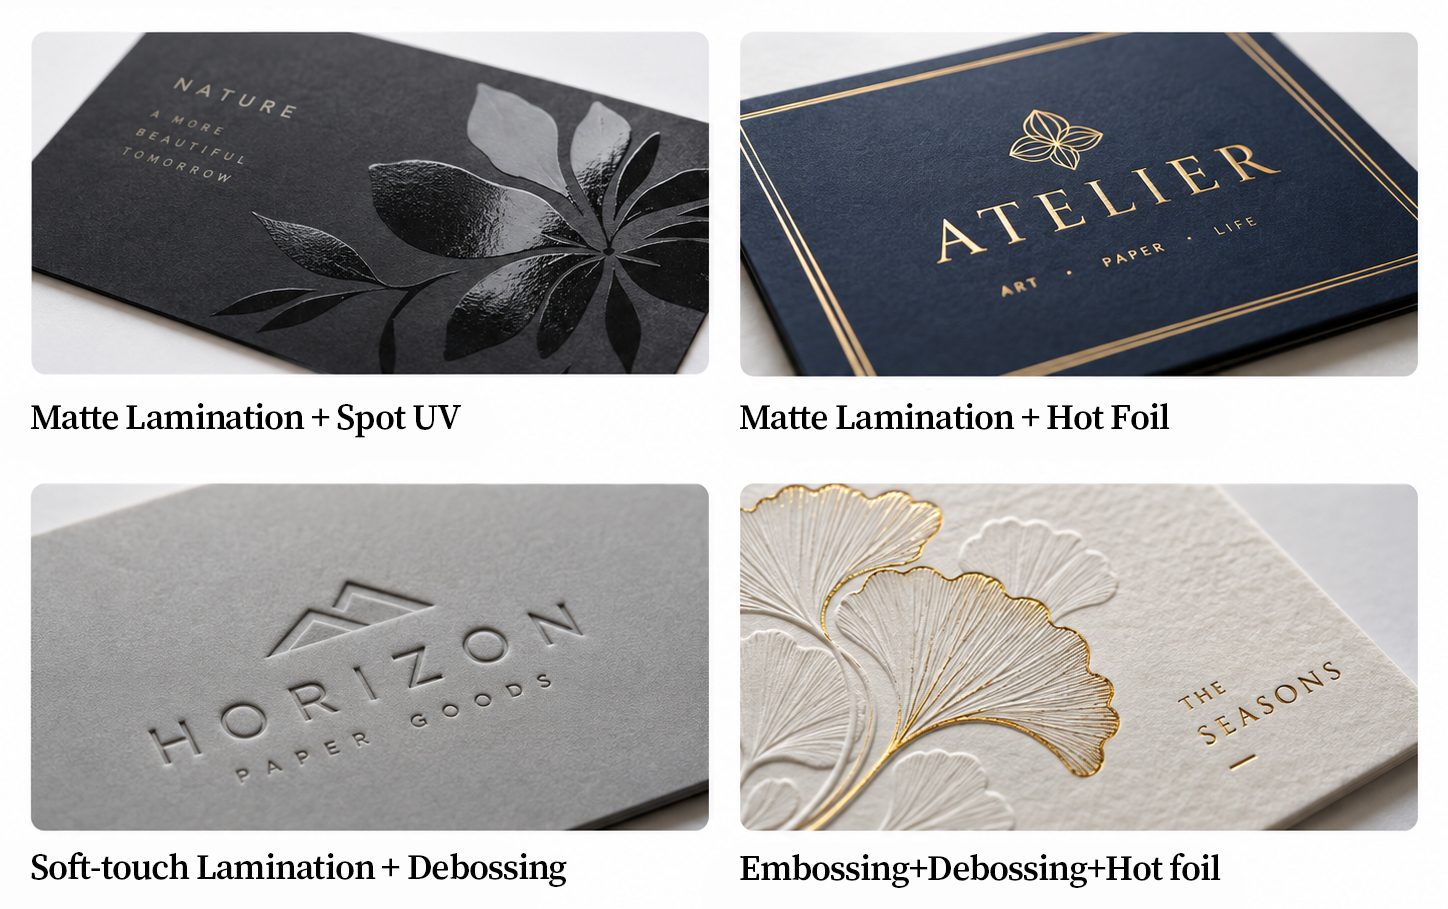
Figure 5. Common finishing combinations: matte + spot UV, matte + hot foil, soft-touch + debossing, and foil + relief.
What Order Should Finishing Follow?
A typical production sequence can be understood as: printing → coating or lamination → foil / embossing → spot UV → die cutting / creasing → binding. The exact route depends on the substrate, equipment and finish, but the core principle is that each later process must work reliably on the surface created by the previous one.
For multi-finish products, it is better to confirm the whole route before production rather than adding decoration after the print is already complete.
How Should Finishing Be Prepared in the Artwork?
1. Foil areas: use a separate spot-colour layer with vector artwork and solid fills. Do not use a CMYK gold build as a substitute for foil.
2. Spot UV: supply a separate mask containing only the UV shapes. Use vector artwork where possible and avoid hairlines or micro type.
3. Embossing / debossing: provide a separate vector layer and state whether the requirement is emboss, deboss, blind relief or multi-level relief.
4. Die lines and crease lines: keep them on their own layers and label them clearly as CUT and CREASE. Do not leave them in the final printed artwork.
5. Bleed and safe area: follow the approved dieline and supplier requirement, and keep important text and logos clear of trim and crease lines.
How Does Finishing Change Cost?
Finishing cost is usually driven by four things: tooling, machine setup, additional production passes, and waste or registration risk. Foil dies, embossing tools and cutting dies are relatively fixed costs, so they have a much larger effect on unit price at low quantities than at high quantities.
When requesting a quotation, ask the supplier to separate tooling, make-ready, finishing unit cost and process lead time. This makes it much easier to see which finishing step is driving the price.
How Does Finishing Affect MOQ?
Some finishes do not have a strict technical MOQ, but they create an economic MOQ. A foil die costs roughly the same to make whether the order is a few hundred pieces or several thousand, so fixed costs represent a much larger share of the unit price at low volume.
How Does Finishing Affect Lead Time?
A complex project may include printing, drying, lamination, foil, embossing, UV, die cutting, folding, binding, inspection and packing. Every additional offline process needs another machine slot and another setup.
Instead of asking only for one total lead time, ask for the timing of each major process. This makes it easier to understand where the schedule is actually being consumed.
Can Laminated Paper Be Recycled?
Recyclability depends on the total material structure and the local recycling system. Water-based coatings are generally easier to handle in repulping than paper permanently bonded to plastic film. Plastic films, heavily cured coatings and metallized structures can make fibre separation more difficult.
A paper-based product should therefore not automatically be marketed as "100% recyclable" simply because the base stock is paper. If recyclability is a core requirement, the surface finish should be part of the material decision from the start.
Does Lamination Affect FSC Claims?
FSC claims and actual recyclability are two different questions. FSC relates to certified forest-based material and chain of custody. Whether the final product can be recycled locally depends on its structure, materials and the recycling system.
For products using an FSC claim, confirm the certified paper source, the supplier's chain-of-custody status, the permitted label or claim, and the final product construction.
What About Children's Products?
For children's products, inks, coatings, films, foils, adhesives and accessible substrates may all be relevant to compliance assessment. The applicable requirements depend on the destination market, age grading, product category and accessible components.
The practical production rule is to lock the materials and finishing specification before compliance testing whenever possible. Changing a coating, film, foil or adhesive after testing may require the compliance assessment to be reviewed or repeated.
Common Finishing Mistakes
· Deciding on foil, UV or embossing only after the artwork is finished, so the layer structure and line widths are not suitable for production.
· Using a CMYK gold colour instead of a dedicated foil layer.
· Designing foil logos with hairlines or very small negative detail that may fill in during transfer.
· Folding heavy, laminated or dark solid stock without planning a crease.
· Approving colour only from a screen or PDF without considering how gloss, matte or soft-touch film changes perception.
· Adding too many finishing effects simply to make the product look premium, which increases cost and can weaken the visual hierarchy.
How to Choose a Finish for Stationery
· Everyday notebook: matte lamination can be considered when durability and lower glare are priorities.
· Premium notebook: soft-touch or matte lamination plus hot foil can strengthen the logo and tactile feel.
· Minimal premium look: a tactile surface plus blind debossing works well when no extra colour is needed.
· Gift packaging: choose lamination plus foil or matte lamination plus spot UV depending on the visual emphasis.
· Lower-plastic approach: where suitable, evaluate unlaminated board plus a water-based coating.
· Custom shapes: include die cutting and creasing in the specification from the quotation and design stage.
Related Product Examples
【A5 Daily & Weekly Spiral Planner Notebook】
【Spiral Binding Daily & Weekly Planner】
【2026-2027 A5 Spiral Planner Notebook】
Frequently Asked Questions
What are the most common print finishing techniques?
Protective finishes commonly include lamination, varnish and aqueous coating. Decorative finishes commonly include foil, spot UV, embossing and debossing.
Is spot UV the same as embossing?
No. Spot UV adds a cured surface layer, while embossing physically reshapes the substrate.
Can foil be applied over lamination?
Yes, and it is common, but the film and foil combination should be confirmed before production.
Will matte lamination make colours darker?
It usually makes colours read softer and can push a solid black toward charcoal, so dark designs are best checked on a physical proof.
Does 200 gsm cover stock need creasing?
Heavy, dark or laminated stock generally benefits from creasing. The final requirement should be confirmed based on the stock, grain direction and finishing stack.
What makes finishing expensive?
Tooling, make-ready, multiple offline passes, registration requirements and additional waste are the main cost drivers.
Buyer Checklist Before Requesting a Quote
· Product type
· Finished size
· Target quantity
· Paper or cover material
· Print method and colours
· Lamination or coating
· Foil requirement
· Emboss or deboss requirement
· Spot UV
· Die-cut shape
· Creasing / folding requirement
· Production artwork
· Destination market and compliance requirements
· Target delivery date
Final Considerations
Print finishing is not simply decoration added after printing. It is part of the product engineering process. Lamination, coating, foil, embossing, debossing, spot UV, creasing and die cutting all affect appearance, production difficulty, artwork preparation, cost and lead time.
For B2B stationery and packaging projects, a more efficient sequence is: material → printing → finishing → converting → binding → compliance. Locking the full route before mass production reduces artwork revisions, unnecessary tooling changes and avoidable production risk.
Need Help Choosing a Finish?
If you are developing a notebook, sticky note set, presentation folder, clipboard, gift box or other paper stationery product, prepare your artwork, target quantity, preferred materials and desired surface effect. These inputs can then be converted into a production-ready finishing specification and a clearer quotation.
Next :
-
Related News
- Paper Printing Methods: How B2B Buyers Can Choose the Right Printing Process
- How Should B2B Buyers Compare Packaging Costs for Cross-Border Stationery Orders
- Sewn, Spiral or Glue Binding: Which Notebook Construction Is Best?
- OEM vs ODM Stationery for Retail Brands: How to Choose the Right Sourcing Model
- Pencil Case Materials, Styles, Features Guide
- Back-to-School Stationery Sourcing Calendar for Retailers: When to Order for 2027
Leave me a message